Tech tutorials Migrating Google Sites Data to SharePoint Online Using PowerShell
By Insight Editor / 10 Jan 2018 16 May 2019 / Topics: Artificial Intelligence (AI) , Microsoft 365
Helping clients migrate business information into Office 365 SharePoint Online is one of Insight's core competencies, whether it be from SharePoint On-Premises, tenant to tenant migrations, pushing documents from file shares with metadata mapping, or from any other third-party systems.
Our many offices are constantly working on these types of projects that involve all sizes of content to help our clients with their moves to the cloud. Many times, these projects are under a tight deadline due to business diversification, support or normal cost-cutting measures.
To ensure speed and accuracy of migrations, we rely on an enterprise-level migration tool that integrates with SharePoint. This ensures content is always moved in a timely and consistent manner, with complete metadata attachment that can be accomplished in a short timeline.
That said, there are times when the current third-party storage system relies on APIs that vendors don’t want to support anymore, or the tools don’t work as advertised. This scenario occurred during a large migration from Google Sites to SharePoint Online, where only two vendors’ tool sets were found that purported to support the Google APIs, but neither would connect to the Google Sites, let alone move the content.
That meant the team had no reports to review on types of documents or the volume of documents that might be stored in the file cabinets/attachments, instead relying on visual inspection of content. With more than 1,500 sites to walk through, manual tracking sites and their content quickly became untenable.
Once the team realized that neither vendor's tool set would work against the Google Sites API, they made a decision to build custom Windows PowerShell scripts using its vast capabilities to query the Google Sites for their documents and metadata against the Google Data API.
Right away, we found we had to discern whether the sites were Classic style from before November 2016 or New Sites, as Google had moved away from the GData API format. Luckily, most of the sites were built using Classic mode, so only one API format was needed.
Once we had an extract of Google Sites URLs to work from, and which API to target, we created a PowerShell script that would query a site for all of its file cabinets and attachments, collate their associated metadata together (file name, updated date, author, Content Delivery Network (CDN) path) and then write out each file’s metadata to a CSV for reviewing by the team.
That would allow everyone to see the volume of content each site had. And later, using this CSV output to feed the next PowerShell script would then pull the file down from the CDN and push it into a target SharePoint site's document library.
To get started with this script, we had to break down connecting to the GData APIs into their core requirements and then merge them back together into a unified PowerShell script.
Create a service account.
The first step is to create a service account that would be our broker for accessing all of the data. Navigating to the Google API dashboard and signing in with Google admin credentials granted by the suite administrator, we create a project that will hold our credentials.
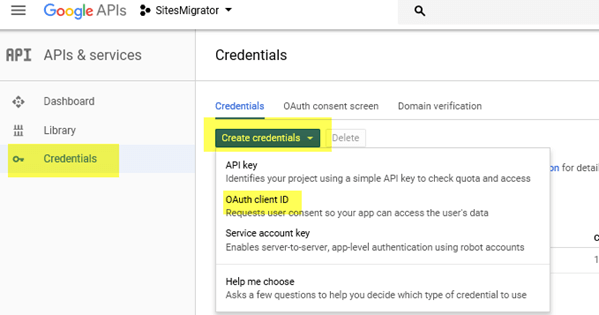
Once the project is created on the dashboard, we need to click on the Credentials left link and the Create Credentials drop-down, and then select the OAuth Client ID choice.
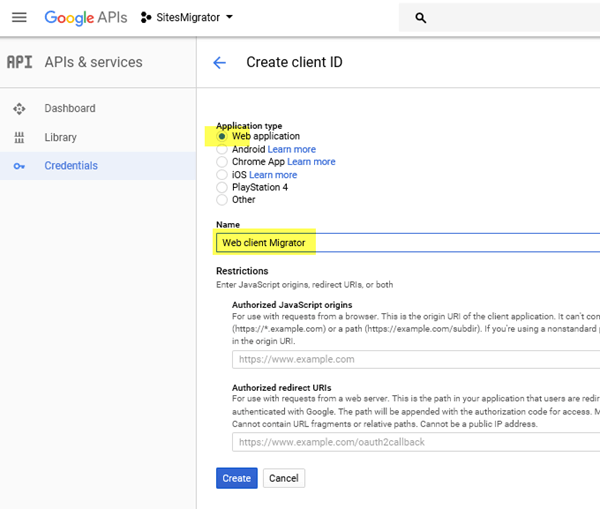
On the creation page, select the Web Application choice, give it a descriptive name and click on the Create button.
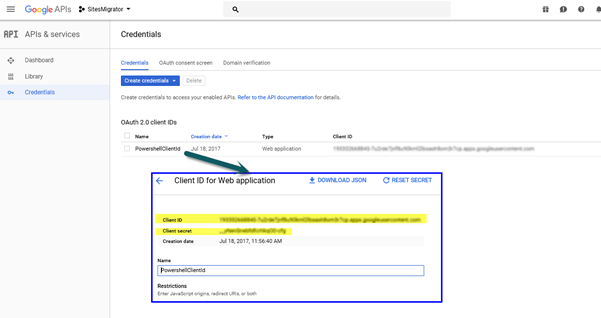
The screen will now reload, showing us our credentials. Click on the name to load the details screen and copy the Client ID and Client Secret for the next step.
Authorize the service account with the right API.
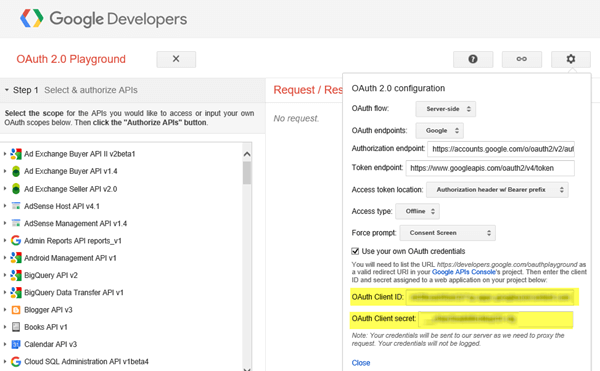
Now with an account, we need to navigate to the Google Developers OAuth 2.0 and use the Client ID and Secret to generate an authorization token to make API queries with. We do this by clicking on the Use Your Own OAuth Credentials checkbox in the upper-right gear and then updating the OAuth 2.0 Configuration with Client ID/Secret.
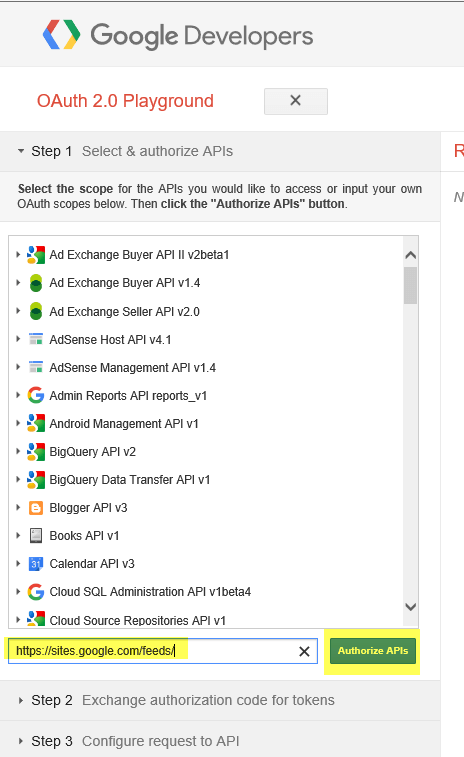
Now on the left side in the Step 1 Scopes box, enter the Classic Sites API we need to authorize and then click on the Authorize APIs button.
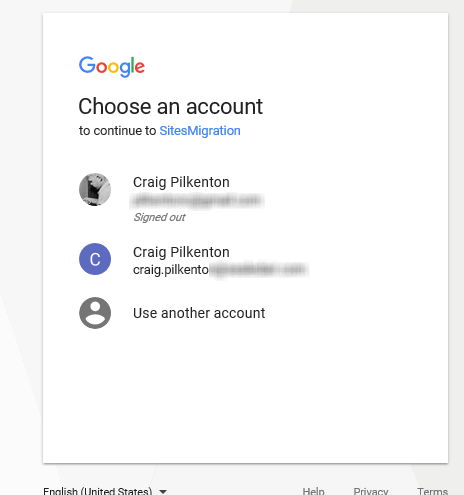
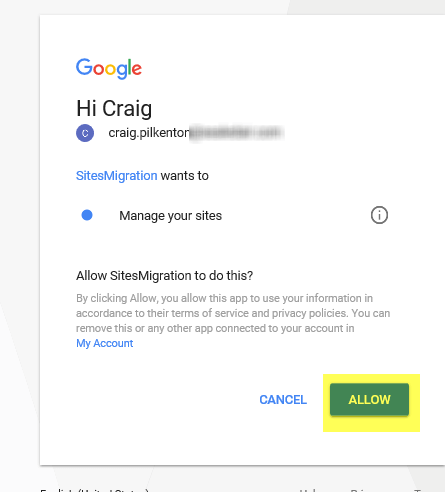
An Authorization screen will appear. Select the admin account you used above to create the credentials. The screen will refresh to allow the scopes to be managed, so click the Allow button to finish.
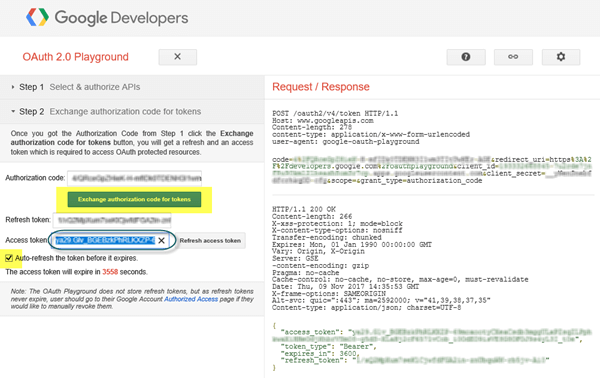
The OAuth page will now show Step 2 — Exchange Authorization Code for Tokens. Click the Auto-Refresh token checkbox and then click the Exchange Authorization Code for Tokens button. This will generate the Access Token we need to query Google APIs. Finally, copy the Access Token from the textbox to use in our PowerShell scripts.
Query to evaluate the returned data.
With the Access Token captured, we move over to using a web request tool to see how the data is returned from the Google API. I prefer Postman, but others, such as SoapUI or Runscope.com, will work as well.
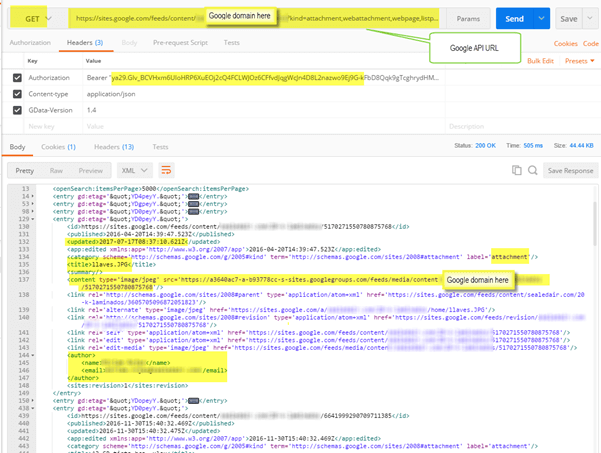
In our tool, we just need to put together our Google Sites URL and the headers to pass, which requires the Access Token we gathered before from Google. After posting our GET command, we can see the body data returned shows all of the individual entries from the query.
Although there’s not a lot of metadata stored in Google Sites around documents, we note the core values we'll use to pull down the file and then, after uploading to SharePoint, set its metadata fields. Core values:
- Content — CDN path to the file where it truly lives
- Updated — modified date
- Title — nice name of the file for displaying
- Author — modified by
Query and export the API data to CSV.
Now that we know how the data is formatted from the API, we create our PowerShell script to query the Google Site for its documents to log in to a CSV. Using the code below, I'll call out the line numbers of the important processing.
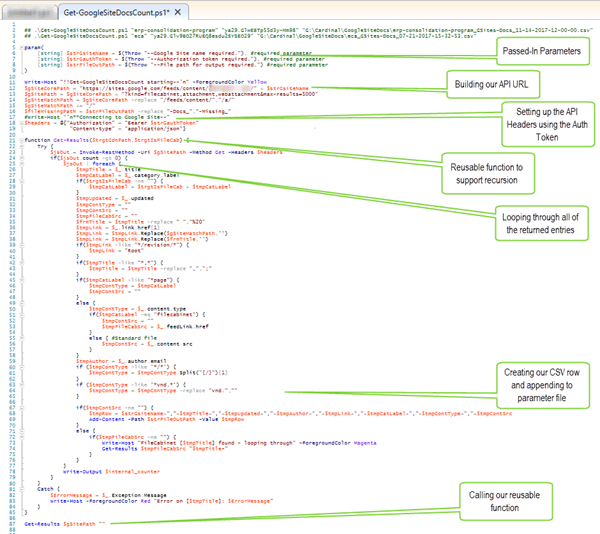
- Starting with lines 5–9, we intake the parameters needed to fire the query and output the values to a CSV. This also makes it modular so it can be called from other PowerShell scripts or scheduled tasks.
- From lines 12–19, we set up our API query and the headers needed to authenticate.
- From lines 21–85, we create a Get-Results function of our core code so that we can use it recursively as Google allows FileCabinet pages to be nested within each other — hence, the need to call itself again.
- On line 23, we call the PowerShell Invoke-RestMethod using our setup values from above, which ensures a secured query and that the data returned will be in JavaScript Object Notation (JSON) format for object processing into a variable called $jsOut.
- Now, beginning with lines 25–77, we pass the $jsOut variable to the inherent ForEach method, which will allow us to loop through each entry node found in the JSON.
- On lines 26–65, we set up all of our row variables and finesse the data to make sure it conforms for using it later to pull down these documents. The core pieces are the $tmpTitle variable, which is the nice name of the file, and the $tmpContSrc variable, which is the Google CDN path of the file to download from.
- On line 67, if the content source URL isn’t empty from Google, we create a CSV-formatted row of all of the variables and then use the inherent Add-Content method to append the row into the file output parameter passed in.
- If the content source URL variable is empty, then on line 72, we fail into a check to see if this is a FileCabinet link. If so, we recursively call our Get-Results function with the new 'parent' URL to go do all of the logic checking on this new child FileCabinet.
- The final piece on line 87 is to start calling the Get-Results function, sending in the parameter URL to get things started.
The image below shows the CSV file output from the script with our header row of columns and all of the subsequent rows of comma-separated values in the same order we'll use for migrating the documents later. The highlighted selections show the file name we'll upload, the last modified date, the user to set as modified by (if he or she still exists) and the Google CDN URL, which is required later to bring the file down for migrating.

Migrate the documents to SharePoint Online.
With our Google Site documents pushed out into a CSV file, we can now use that file to feed a download/upload script that will pull the files down locally from Google and then push them to a targeted SharePoint document library.
Below shows only the core download/upload script. It would normally be called by a master script that used a ForEach through all of the rows of our above CSV, passing in the variables we want it to evaluate.
Again, using the code below, I'll call out the line numbers of the important processing:
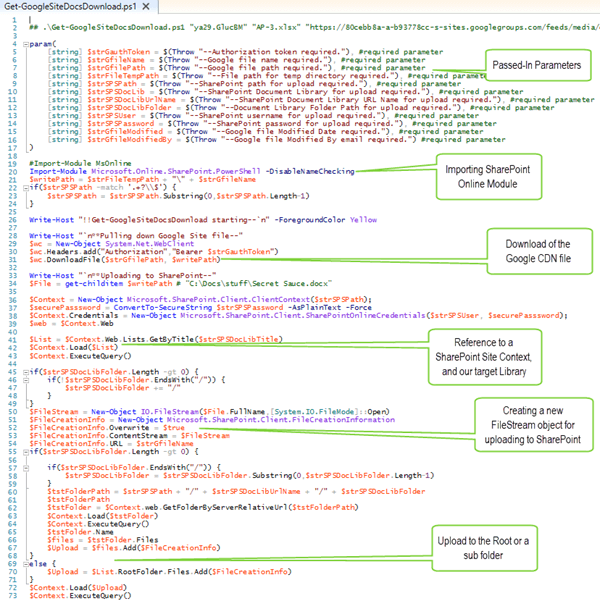
- Starting with lines 4–17, we intake the parameters needed to fire the script and do the necessary processing. Although this seems like quite a few parameters, it makes it modular so it can be called from other PowerShell scripts or scheduled tasks, as well as at least set the core file metadata.
- On line 20, we use the Import-Module command to ensure the SharePoint Online PowerShell cmdlets are imported, in case the script isn’t being run inside there.
- From lines 29–31, we instantiate the System.Net.WebClient object and headers with our Google Authorization Token to force a copy of the file down to our temporary folder location. We need a digital copy of the file for it to be uploaded to SharePoint Online.
- Now on lines 36–43, we set up our SharePoint objects and get a reference to the site and library/subfolder where we want to upload the file to.
- Then, on lines 50–54, we instantiate an IO.FileStream object that’s hooked to our locally downloaded file. Then we create a SharePoint FileCreationInformation object with our FileStream object referenced.
- Line 55 checks to see if a subfolder path was passed into it.
- Since a subfolder path was passed in:
- On lines 57–67, we test if the passed-in library/subfolder exists to get a reference to the location, and then use that reference to upload the file to that reference object.
- On line 70, no folder was passed in, so we upload to the root of the library.
- Since a subfolder path was passed in:
- Then, on lines 72–73, we add our file upload to the SharePoint Context and have it fire the asynchronous ExecuteQuery() function to push the file up
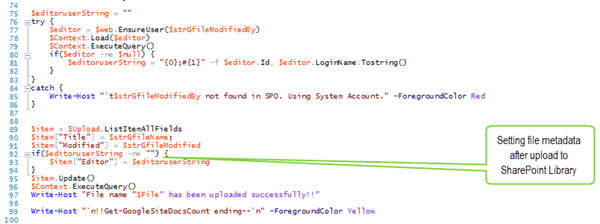
- Now that the file is uploaded, we have a reference so we can update its metadata. Using lines 76–86, we use a Try-Catch to test if the user still is part of the company and, if so, set up an Office 365 user id string.
- Finally, on lines 89–96, we obtain a reference to all of the file columns, set the values for the title, modified and editor fields, and then fire an update on the reference using a final asynchronous ExecuteQuery().
Although it seems like a large, ungainly amount of work, with all of this together, we now have a fully functional process for querying Google Sites of all of their documents and then migrating them to SharePoint Online.
The biggest hurdle to overcome was Google's authentication needs and how to get a listing of all of the Google Site's file locations so they could be programmatically migrated, including figuring out that recursion was needed.


