Tech tutorials Access the Outlook API Using the OAuth2 Implicit Flow
By Insight Editor / 12 May 2016 , Updated on 16 May 2019
By Insight Editor / 12 May 2016 , Updated on 16 May 2019
I was recently tasked with creating a web part for displaying a user’s Outlook calendar events using the new Microsoft Outlook API endpoints. This requires passing an authorization token in the header of any request in order to gain access to a user’s Outlook data.
Before you flee at the prospect of dealing with SharePoint, let me assure you this guide has very little to do with SharePoint (I know very little about SharePoint and how it works). This article is a step-by-step guide of how I connected to the Outlook API.
OAuth2 has several “flows” that handle different scenarios. There’s the Authorization Code flow, Implicit Grant flow, Resource Owner Password flow and the Client Credentials flow. The latter two are only used in very specific situations, so I won’t go into those here. The most commonly used are the first two.
The Authorization Code flow requires server-side code and makes multiple requests — the first to get a code that’s then used to obtain an authorization token from the authorization server in a second request. The Implicit Grant flow is executed entirely from client-side code (JavaScript, more than likely) and only uses one request made to the authorization server to obtain an authorization token.
As you can see in the diagram below, there’s a lot going on when that one request is made:
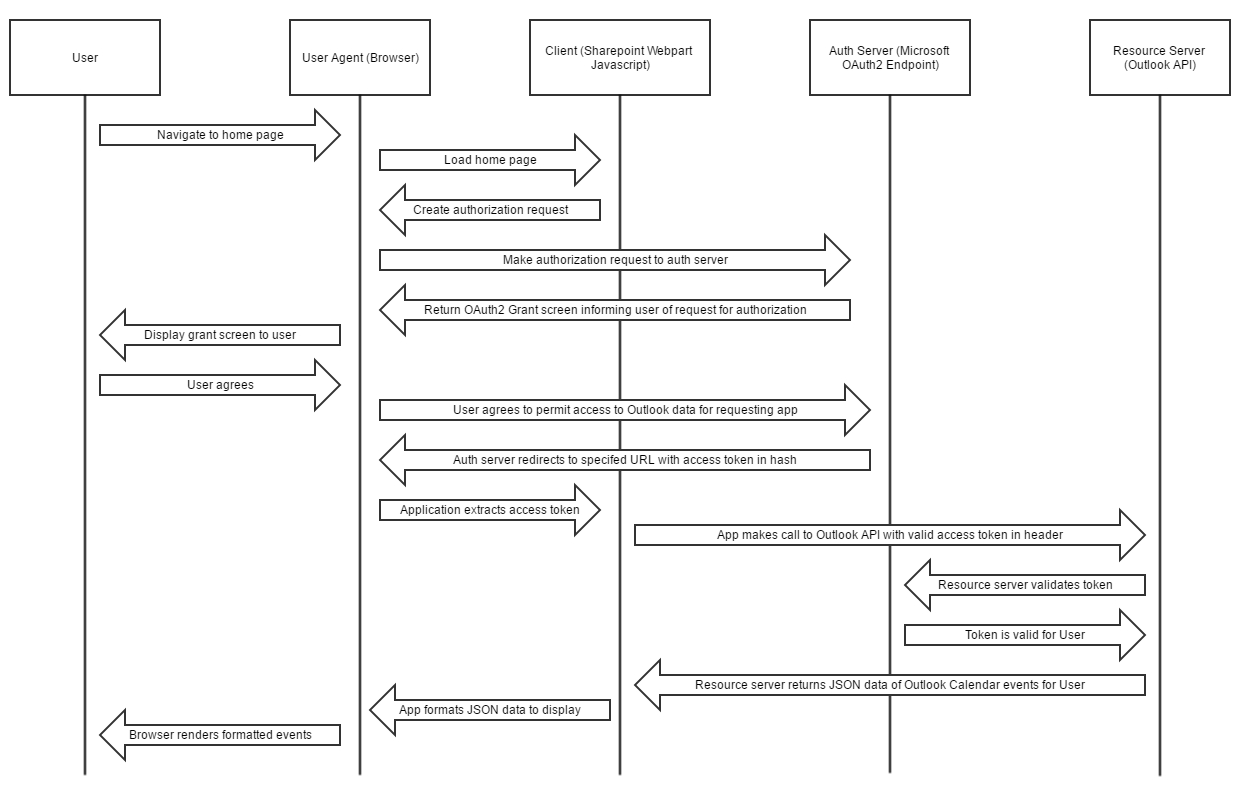
The first step for getting the data we need is constructing a call to the Microsoft OAuth2 authorization endpoint. There are five total parameters, though not all are required. They are as follows:
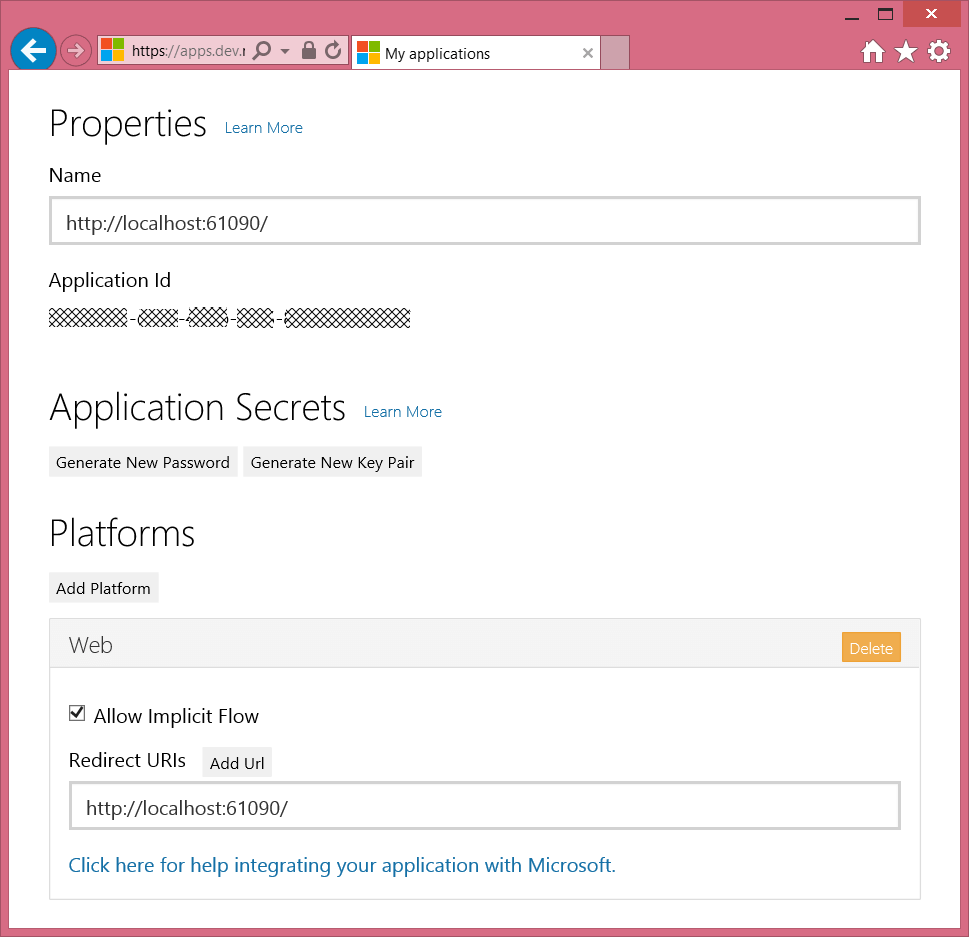
Client ID — obtained when registering the application with Microsoft’s Application Registration Portal. This identifies to the authorization server that this application is recognized as being able to make requests for tokens. After registering the app, you’ll need to be sure to add a web Platform entry, add your redirect URL and make sure the “Allow Implicit Flow” checkbox is checked:
Redirect URI — tells the authorization server where to send the token back to. This is where we’ll extract the token from the hash fragment. In our case, we’re simply redirecting back to our homepage, the same page from which we made the initial request. This is not a required parameter per the OAuth2 specification, but it’s commonly used.
Response Type — tells the authorization server what it should respond with (and effectively determines which OAuth2 flow we’re using.) In our case, this is set to “token,” telling the authorization server it will be returning an authorization token. If we were using the Authorization Code flow, for example, the response type would be “code.”
Scope — another optional parameter that tells the authorization server the scope of what we need to be able to do with our subsequent request. In our case, we’re using the https://outlook.office.com/Calendars. Read scope to tell the authorization server we’re only interested in being able to read a user’s Outlook calendar data. If this parameter is not specified, the authorization server should have a default scope it uses.
State — a security-related parameter that can be added to the request to make it easier to verify the response is coming from the authorization server and not another source with ill intent. The idea is to create a string that would be very difficult to mimic (some suggestions I found were to use a hash of the session ID, or current date time, or both) and then send this with the request. The authorization server should then send back the exact same string when it returns the authorization token. If not, then the call was hijacked, and the response can’t be trusted.
var clientId = "356c9774-a1f2-44g0-a873-f8az9de78657";
var redirectUrl = “http://localhost:61090/”
var authServer = “https://login.microsoftonline.com/common/oauth2/v2.0/authorize?”;
var responseType = "token";
var stateParam = Math.random() * new Date().getTime();
document.cookie = "myEventsState=" + stateParam;

var authUrl = authServer +
              "response_type=" + encodeURI(responseType) +
              "&client_id=" + encodeURI(clientId) +
              "&scope=" + encodeURI("https://outlook.office.com/Calendars.Read") +
              "&redirect_uri=" + encodeURI(replyUrl) +
              "&state=" + stateParam;

window.location = authUrl;
After making this call, the user will be presented with the standard Microsoft authorization page, where he or she will choose the account to authorize the Outlook API for and will be informed of the scope of the request (this is your typical “the application has requested permission to access your calendar” message). Then, the user will be redirected back to the homepage, with a few new parameters in the hash fragment.
Here’s an example of the request URL:
https://login.microsoftonline.com/common/oauth2/v2.0/authorize?response_type=token&client_id=356c9774-a1f2-44g0-a873-f8az9de78657&scope=https://outlook.office.com/Calendars.Read& redirect_uri=http://localhost:61090/&state=401441800319.273
Here’s an example of the URL after the redirect (I trimmed the token for brevity):
http://localhost:61090/#access_token=eyJ0eXAiOiJKV1Qi.eyJhdWQiOiJod
HRwczovL291dGxvb2sub2ZEuMCJ9.jdIR9ia_1lth7VVgt2E3GqKkZrB5GIfkz_8C
pgV3H_g&token_type=Bearer&expires_in=3599&scope
=https%3a%2f%2foutlook.office.com%2fcalendars.read&state=401441800319.273
You’ll notice the state parameter is identical between the two URLs, which indicates the response is safe.
At this point, we can choose to store this token in a cookie so the user won’t have to continue to grant access each time he or she navigates to the page. One of the ways the implicit flow differs from others is there are no refresh tokens granted, which allows the refreshing of access tokens without having to go through the authorization process again.
With the implicit flow, once the access token has expired, that’s it — you would need to start the process over to get re-authorized. We store the token in a cookie with the same expiration as the token so if the user logs back in within that time period, he or she won’t have to re-authorize. Here’s a snippet of code to demonstrate:
var token = getHashParameterByName("access_token");
var expiresIn = getHashParameterByName("expires_in");
var returnedState = getHashParameterByName("state");
var stateToMatch = getBrowserCookie("myEventsState"); //state parameter cookie
if (token && stateToMatch && (stateToMatch == returnedState)) {
    var cookie = token;
    if (expiresIn) {
        var now = new Date();
        var hourLater = new Date(now.getTime() + (expiresIn * 1000));
        cookie = token + ";expires=" + hourLater.toUTCString();
    }
    document.cookie = "myEventsCookie=" + cookie;
}
Next, we make the call to the Outlook API endpoint with our authorization token. In this specific instance, we’re calling the calendarview endpoint to retrieve Outlook calendar events for the given user. This requires a start datetime and an end datetime in UTC format, as well as a limit to the number of events retrieved (using the $top query option from OData). Then we make a simple AJAX call with our authorization token in the header:
var startDateTime = moment().startOf("day").format("YYYY-MM-DD HH:mm Z");
var endDateTime = moment().endOf("day").format("YYYY-MM-DD HH:mm Z");
var apiUrl = "https://outlook.office.com/api/v2.0/me/calendarview?startdatetime=" + startDateTime + "&enddatetime=" + endDateTime + "&$top=" + 10;

$.ajax({
    type: 'GET',
    url: apiUrl,
    headers: {
        "Authorization": "Bearer " + token
    }
}).done(function (data) {
    processResults(data); //parses the json into objects used for display
}).fail(function (response) {
    $("#myevents").html("<span>Could not retrieve events</span>");
});
This will return a response that, if successful, will contain JSON representing all of today’s events from the user’s Outlook calendar.
You can play around with the API at https://oauthplay.azurewebsites.net by logging in with any Microsoft account.
If you need to make a call to an OAuth2 protected endpoint from client-side code, the implicit flow is the way to go. It’s pretty straightforward once you understand the parameters required in your request and how to extract what you need from the response. Once you obtain that authorization token, getting the data you need is as simple as adding an HTTP header and firing away.
Advertisement