I’ve been doing software development for 15 years. My current work involves potentially moving over to FeedHenry. Since the CloudApp/WebAPI side is Node.js-based, I’ve been looking for node frameworks that would help build a RESTful API (for interaction with mobile/web apps). This article documents my experience going through LoopBack documentation and tutorials.
Intro to StrongLoop-LoopBack API
In my research of various node frameworks (Express, restify, etc.), I stumbled upon LoopBack. Some of the things I like about it are:
- The ability to quickly scaffold an API with Yeoman
- Based off Express.js
- Model-based (There’s a Command-Line Interface (CLI) “wizard” to walk you through model creation.)
- Readily available connectors to a multitude of databases, such as MySQL, PostgreSQL and MongoDB. (Note: Oracle, SQL Server and SharePoint connectors do exist, but they require a paid tier.)
- Built-in user authentication (OAuth)
- A database “automigration” option to initialize database tables/collections
- Built-in “explorer” rendering an API user interface on exposed methods
Although it seems a lot of magic is going on, there’s typically a manual way to create/alter existing files for better control for a developer. In this article, we’ll walk though how to create a simple RESTful API that manages user reviews for gyms and health clubs.
The setup (assuming fresh start on Windows 8)
- Install the latest version of Node.js and Node Package Manager (NPM). If you have experience with Linux systems (such as Ubuntu), NPM would be the equivalent of apt-get to install node packages.
- Install StrongLoop (with LoopBack). Using NPM, enter the following at the command prompt:
npm install -g strongloop
- For this project, install MongoDB. We’ll need this for our database, although you’re welcome to substitute this for your database of choice.
Hello, world (creating the app)
Creating the app is actually quite simple since StrongLoop uses Yeoman for scaffolding.
First, create a subdirectory for the application and then create a basic LoopBack application by entering slc loopback at the command prompt. This will auto-generate all of the initial code/files needed for a “hello world” API.
- To test and see if everything scaffolded properly, enter node . at the command prompt to start the API. By default, the app is on port 3000 (this can be changed in \server\config.json), and if you go to http://localhost:3000, you should see some JSON.
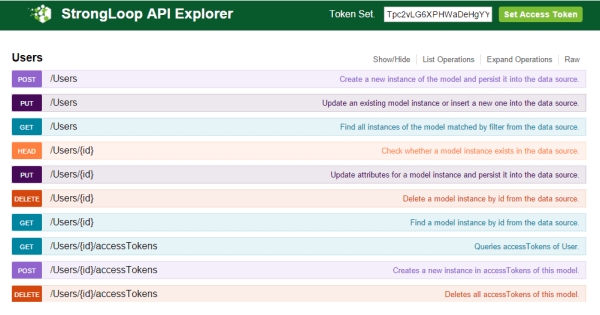
- API Explorer (http://localhost:3000/explorer) — This is automatically created and is an easy way to see what REST services are open. As you add/remove models, this will be updated for you. You can even make test calls from here. You’ll notice User CRUD methods exposed (and more), and this comes out of the box with LoopBack.
Under the hood
Obviously, what just happened seems like “magic," but let’s go over the relevant files/folders created and the importance of those parts.
- The /commons/models folder holds all custom models we’ll be creating.
- The /node_modules folder is where NPM places all dependent modules for this application.
- The /server folder:
- Contains configuration files (*.json) for the application. If you need to modify the IP, port number, datasource credentials, mappings of models to datasources, etc., you’ll find it here.
- The /boot subfolder holds *.js code that gets executed on startup.