Tech tutorials Dockerize DevOps Workflows
By Insight Editor / 30 Jan 2018 , Updated on 16 May 2019 / Topics: Application development
By Insight Editor / 30 Jan 2018 , Updated on 16 May 2019 / Topics: Application development
"It works on my machine" is often associated with application development when a developer makes a change that works locally but ends up breaking something in production. We’ve all been there, trying to run a command-line utility only to find something isn't right. Something has changed, and your peer responds with, "I can run it from my machine." Sound familiar?
While working on DevOps in Azure, I’m constantly using the Azure Command-Line Interface (CLI), Terraform, along with Ansible. The Azure CLI and Ansible both require Python, and it just so happens they can use different versions as well. Of course, Python versions can run side by side with each other and, for a long time, things just worked. Until they didn’t. So how can Docker help?
What if we build a Docker image that can be used to set up an environment that’s purpose-built for the utility we’re trying to run?
Here’s a breakdown of the problems we’re trying to solve:
Docker to the rescue.
Let's go through an example "for the sake of argument" that just so happens to be real and something I use every day.
I’m a member of a cloud DevOps team that’s responsible for creating, configuring and maintaining cloud infrastructure in Azure. A common and very powerful tool at my disposal is Azure CLI 2.0. My goal is to create a Docker image my team and I can use.
The high-level steps I’ll perform are as follows (keep in mind these steps could be done regardless of what utility you wish to "Dockerize"):
Let's get started.
Visit https://docs.docker.com/engine/installation/ and follow the setup for your operating system.
The folks at docker.com have made it very easy to install Docker, so you shouldn’t have any problems here. For this, I happen to be using Docker for Windows, which allows me to build Linux and Windows images.
We can ensure Docker is running by firing up our favorite terminal and running a Docker version command.
You should see something like this:
$ docker version
Client:
 Version:      17.06.2-ce
 API version:  1.30
 Go version:   go1.8.3
 Git commit:   cec0b72
 Built:        Tue Sep  5 20:00:17 2017
 OS/Arch:      linux/amd64

Server:
 Version:      17.06.2-ce
 API version:  1.30 (minimum version 1.12)
 Go version:   go1.8.3
 Git commit:   cec0b72
 Built:        Tue Sep  5 19:59:19 2017
 OS/Arch:      linux/amd64
 Experimental: true
We need a place to put all of our hard work, so let's create a git repository and push our initial changes to https://github.com/.
This is straightforward but, if you need some help, you can find for more information in GitHub help on how to create a repo.
Once this is set up, we’re ready to start adding files. It’s always a good idea to create a readme.md file to describe your repository.
A Dockerfile represents how our Docker image will be built. There’s a lot you can do in a Dockerfile, but everything we’ll do here will be very simple, so don't stress the specifics. If you need to know more, take a look at the docs.
We need to set up an environment that can run the Azure CLI. Normally, this would involve digging into the requirements, Python in this case, and adding all of the things the Azure CLI requires. Lucky for us, the Azure CLI team has done this already, so we’ll just layer on top of what they’ve already done. You can take a deeper look at what they’re doing in this image by checking out their Dockerfile.
Rather than repeat what they’ve done in their image, we’ll just use their image as our base. This has the added benefit of giving us any changes the team developing the Azure CLI might make in the future. This turns out to be a huge benefit since Azure is constantly adding new resources, and the ability to interact with those resources in the Azure CLI quickly is a must.
Here’s the start of our Dockerfile:
FROM azure-cli:latest

CMD bash
Let's go ahead and build this and test out what we have. Here we’ll create our image with the name "azhelper" for easy reference.
> docker build -t azhelper .
Sending build context to Docker daemon  113.2kB
Step 1/2 : FROM azuresdk/azure-cli-python:latest
 ---> b95f51b22e75
Step 2/2 : CMD bash
 ---> Running in f0009bc62755
 ---> 404cf2421bd4
Removing intermediate container f0009bc62755
Successfully built 404cf2421bd4
Successfully tagged azhelper:latest
We can see that our image is now available:
> docker image list
REPOSITORY           TAG                 IMAGE ID            CREATED             SIZE
azhelper             latest              eaf6edd080b1        2 weeks ago         376MB
Now we can create our container, which will drop us into the container and at the Bash command line:
> docker run -it azhelper
bash-4.3#
bash-4.3# ls
azure-cli  dev        home       linuxrc    mnt        root       sbin       srv        tmp        var
bin        etc        lib        media      proc       run        sys        usr
bash-4.3# exit
exit

>
Now that we’re running a container where we can execute commands from, try to list your Azure accounts by calling az accounts list.
bash-4.3# az account list
Please run "az login" to access your accounts.
[]
Oops, we need to log in. Try an az login.
bash-4.3# az login
To sign in, use a web browser to open the page https://aka.ms/devicelogin and enter the code ZZZZZZZZZ to authenticate
Follow the instructions to authenticate against your Azure credentials to get access. Try again to list your accounts:
bash-4.3# az account list
[
  {
    "cloudName": "AzureCloud",
    "id": "GUID",
    "isDefault": true,
    "name": "Subscription Name",
    "state": "Enabled",
    "tenantId": "GUID",
    "user": {
      "name": "EMAIL",
      "type": "user"
    }
  }
]
Question: Are we going to have to log in every time?
Answer: Yes, if we leave it this way.
To fix this problem, let’s exit our running container and map a volume where our login access tokens can be stored and persisted outside the container.
Make sure we have a local folder to store the Azure CLI files:
mkdir ${HOME}/.azure
Now run the container again, but let's add the volume:
docker run --rm -it -v ${HOME}/.azure:/root/.azure azhelper:latest
Note: If you’re running this from a Windows machine, you may need to update your syntax to docker run --rm -it -v %HOME%/.azure:/root/.azure azhelper:latest.
What we’re doing here is mapping a volume to the host machine into the container that can be used by the CLI to store needed information. This will allow us to start/stop the container and not require a login every time. Notice the –it, which is what creates the interactive session with the Docker container, and the –rm, which will remove the container once you exit.
At this point, you may ask, “What have we really done here? Why don’t we just use the Azure CLI image directly?” To that I say: But there’s more.
If you just wanted the Azure CLI, you could simply use the base image above.
However, what if you wanted to add workflows that used the Azure CLI? That’s exactly what we want here and what we’ll do next.
As anyone who uses the Azure portal will tell you, it can be a source of relief for quick tasks and a source of immense pain for repeated tasks. Things quickly fall apart at scale and, if you’re dealing with hundreds of resources, it’s exacerbated if they’re across multiple subscriptions.
As a DevOps engineer working in Azure, some of the common requests I get are:
Back in our git repo, let’s add a scripts folder and some common az CLI calls. Everything is written in Bash since that’s the shell we’re using here. We’ll only cover a few to get us through the overall process, but there’s room for expansion.
In the scripts folder, I create a file search.sh that will contain functions related to searching for resources (namely, resource groups and VMs). The calls here are basic, but it should be obvious why having these available to you can save a lot of time.
# search for Resource Group by name
function search-group () {
    query=$1
    az group list --query "[?name | contains(@,'$query')].{ResourceGroup:name}" -o table
}

# search for VM by name
function search-vms () {
    query=$1
    az vm list --query "[?name | contains(@,'$query')].{ResourceGroup:resourceGroup,Name:name}" -o table
}
Note: The query language used by the Azure CLI 2.0 is a standard called JMESPath, which is a far cry from where we were with the CLI 1.0 that had no built-in querying. Instead, you were forced to output in JSON and pipe to something like jq. Of course, you could still use this approach for CLI 2.0, but I find the syntax much easier to follow for JMESPath. It’s also a standardized spec.
We need to get this script into the container. We could just copy this single script, but knowing we’re going to want to build on these scripts in the future, let's assume we’ll have an entire folder of scripts.
COPY scripts/ scripts/
Next, we need a way to load these scripts into the environment so they’re available when we run a container. Let's insert some dynamic Bash awesomeness into our .bashrc file so that this gets loaded at runtime.
RUN echo -e "\
for f in /scripts/*; \
do chmod a+x \$f; source \$f; \
done;" > ~/.bashrc
This may look a bit wild, but I assure you it’s of the simplest intent. Any time Bash loads, anything in the scripts folder will get sourced and the functions made available.
Our full Dockerfile:
FROM azuresdk/azure-cli-python:latest

COPY scripts/ scripts/
RUN echo -e "\
for f in /scripts/*; \
do chmod a+x \$f; source \$f; \
done;" > ~/.bashrc

CMD bash
Let's fire up another build and start a new container.
> docker build -t azhelper .

...

> docker run --rm -it -v ${HOME}/.azure:/root/.azure azhelper:latest

bash-4.3# search-group testgroup
ResourceGroup
--------------------------
mytestgroup-1
mytestgroup-2
bash-4.3# search-group test
ResourceGroup
--------------------------
mytest1
mytest2
mytestgroup-1
mytestgroup-2
bash-4.3#
Things are looking good. We push our changes up to GitHub to save all of the good work.
So, we’ve created this awesome little image to run the Azure CLI from anywhere, and even have room to grow with handy functions for common use. But all this Docker building seems a lot like shipping code and requiring the end user to build it. Let's address this next.
We’re going to use Docker Hub since this is a completely open source and public image (we also get automatic builds), but the same concepts could be applied to a private/on-premise setup.
In Docker for Windows, we can log in to our Docker Hub account, which will let us push our image we built locally.
# Tag our local image
docker tag azhelper straubt1/azhelper
# Push our image up to Dockerhub
docker push straubt1/azhelper:latest
Log in to Docker Hub and view the dashboard, where we should see the image we pushed.
Now let’s add an integration to the GitHub repo to allow for automatic builds.
Note: Docker Hub will only provide this free service if the GitHub repo and Docker image are both publicly available. If this were private/on-premise, similar output could be found by using your build server to handle this for you.
In the Docker Hub repository, click on Build Settings and connect the repository to your GitHub repository.
Once the integration is done, we can set up triggers to determine when to build a new image and what tags to apply. For this example, I’m going with the most basic: Check-ins on the master branch will result in a new build that is tagged latest.
If I go to the Build Details pages, I can see all of the builds and their statuses.
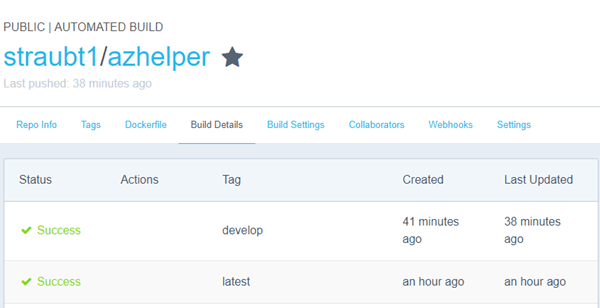
These steps should look familiar to what you were seeing locally, but now it’s all done in the cloud, using two cloud-hosted services (github.com and Docker Hub.io) to build a Docker image that contains a CLI tool used for deploying/configuring cloud services.
We took a utility that we use locally, Dockerized it, added some functionality and now everyone on your team can access it.
Running in this manner should eliminate the "it doesn’t work anymore" problems since everyone is running the same container. As changes to the image are made, all that’s needed is a simple docker pull <image> from the public Docker Hub.
Of course, we’ve also solved another problem: What if I have a need to access the Azure CLI from a build server? Well, now all you need is this image and the ability to map credentials into the container.
This has been a simple yet powerful example of how to Dockerize a utility.
Advertisement