Tech tutorials Getting Started With AKS and .NET Core
By Insight Editor / 10 May 2018 , Updated on 16 May 2019 / Topics: Microsoft Azure
By Insight Editor / 10 May 2018 , Updated on 16 May 2019 / Topics: Microsoft Azure
Containers have been gaining steam at a rapid rate for the last few years and, as companies seek to run containers in production, new challenges occur; scaling, load balancing, deployment and service discovery are all prime examples. Container orchestrators are container technology that help solve these problems and increase developer productivity.
Azure Kubernetes Service (AKS) and .NET Core make it fairly simple to set up and operationalize Kubernetes, a container orchestrator, in Azure. It takes care of tasks such as automating Kubernetes upgrades and cluster scaling. Because it’s Kubernetes, it also maintains application portability, meaning you aren't locked into Azure.
In this article, we’ll look at setting up an AKS cluster and deploying an application. The example is an MVC application that communicates with a back-end service using NATS. NATS is a simple, high-performance, open-source messaging system for cloud-native applications, Internet of Things (IoT) messaging and microservices architectures.
This example application will introduce us to a few of the fundamental Kubernetes concepts: pods, controllers, services and service discovery. It will also show us how we can structure an application to scale back-end services.
Setting up an AKS cluster is easy using the Azure CLI. The Azure CLI is the command-line interface that allows you to manage your Azure resources. If you don't have it installed, you can find directions on Microsoft’s website.
Once you have the Azure CLI installed, log in and ensure the needed Azure service providers are enabled.
az loginaz provider register -n Microsoft.Networkaz provider register -n Microsoft.Storageaz provider register -n Microsoft.Computeaz provider register -n Microsoft.ContainerServiceAs AKS is still in preview, only some locations are available.
az group create --name <resource-group-name> --location eastus
Create a one-node AKS cluster using the Azure CLI. By default, this command creates a standard DS1 v2 Virtual Machine (VM) node. This step takes quite a few minutes to complete.
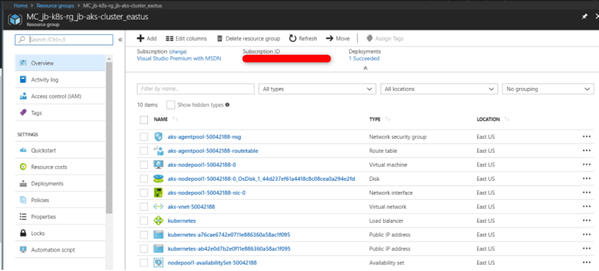
az aks create --resource-group <resource-group-name> --name <cluster-name> --node-count 1 --generate-ssh-keysThis step creates a new resource group and adds several new resources to create your cluster.
Kubectl is the Kubernetes CLI. If you need to install it, you can run this command using the Azure CLI:
az aks install-cliOnce you have the CLI installed, you can configure its context to point to your new cluster by using this command:
az aks get-credentials --resource-group <resource-group-name> --name <cluster-name>You can confirm everything is configured correctly by using the Kubectl get nodes command:
kubectl get nodesYou should see the name of your cluster in the output. Voila, you have an AKS cluster set up in Azure, and you're ready to deploy applications.
Name Status Roles Age Versionaks-nodepool1-50042188-0 Ready agent 4d v1.7.9As I said earlier, the benefit of AKS is that it makes it easy to manage your Kubernetes cluster. For example, you can easily scale your cluster to two nodes. This command takes a couple of minutes because it’s spinning up and adding a new Azure VM.
az aks scale --resource-group <resource-group-name> --name <cluster-name> --node-count 2The example application is available via Github. The branch aks-getting-started-v1 was used at the time of this blog post.
git clone https://github.com/joelbrinkley/aks-getting-started.gitcd aks-getting-startedgit checkout aks-getting-started-v1This application consists of a front-end ASP.NET Core MVC application that sends commands via NATS messaging to a back-end .NET Core service. Within the k8s folder, you’ll find yaml files that describe the desired state of our application.
If you want to install and explore this application locally using Docker, you can run the PowerShell script local-deploy.ps1. This will use Docker compose to build and deploy the application.
./local-deploy.ps1 -buildIn this example, each component to deploy consists of a deployment controller, pod and service. The following is a brief and high-level explanation of each component.
Pods are the basic building blocks in Kubernetes. Pods can run single or multiple containers. They’re designed as disposable entities that are mortal, so once they die, they stay dead, and a new pod is created.
A deployment controller allows us to describe the desired state of our pods. This controller will ensure we have the correct number of pods by recovering any pods that may fail. It also governs rolling out updates.
A service exposes and load balances between pods both internally or externally to the cluster. Every service in the cluster is assigned a DNS name, and our application will use this to integrate components.
Within the k8s folder, let's examine nats.yml. This yaml file consists of a deployment and a service that exposes the NATS container internally to the cluster. Use Kubectl to create the deployment and service on your cluster. After we apply the yaml file and look through the logs, we’ll examine the file in more detail.
kubectl apply -f .\k8s\nats.ymlLet's check and see if the pod was created and check the logs to see if NATS has started.
First, let's list our pods so we can see the status and use the pod name for displaying logs.
kubectl get podsName READY STATUS RESTARTS AGEnats-3798695116-mvpp4 1/1 Running 0 3dNext, show the log of the pod. We can see that the NATS server has started successfully.
kubectl logs <pod-name>[5] 2018/03/22 20:15:23.414561 [INF] Starting nats-server version 1.06[5] 2018/03/22 20:15:23.414600 [INF] Git commit [02dd205][5] 2018/03/22 20:15:23.414678 [INF] Starting http monitor on 0.0.0.0:8222[5] 2018/03/22 20:15:23.414711 [INF] Listening for client connections on 0.0.0.0:4222[5] 2018/03/22 20:15:23.414721 [INF] Server is ready[5] 2018/03/22 20:15:23.415189 [INF] Listening for route connections on 0.0.0.0:6222Finally, get the services. We can see our new nats-service listed in the output.
kubectl get servicesNAME TYPE CLUSTER-IP EXTERNAL-IP PORT(S) AGEkubernetes ClusterIP 10.0.0.1 <none> 433/TCP 4dnats-service NodePort 10.0.39.147 <none> 6565:30831/TCP,6566:30967/TCP,6567:31324/TCP 3dThe deployment describes the name, number of replicas, any labels and the pod template. The pod template describes how the containers should be configured. In our case, we’re using the container image nats:linux, and we want to expose the ports 4222, 6222 and 8222.
apiVersion: apps/v1beta1kind: Deploymentmetadata: name: nats labels: component: nats app: todo-appspec: replicas: 1 template: metadata: labels: component: nats app: todo-app version: v1 spec: containers: - name: todo-messaging image: nats:linux ports: - containerPort: 4222 name: client - containerPort: 6222 name: cluster - containerPort: 8222 name: monitorThe service describes its name and ports we want to map and expose internally to the cluster. Type NodePort tells the service to expose this IP and port internally to the cluster. Later, when we examine the MVC web app, we’ll see how to expose a service externally.
apiVersion: v1kind: Servicemetadata: name: nats-servicespec: selector: component: nats ports: - name: client port: 6565 targetPort: 4222 - name: cluster port: 6566 targetPort: 6222 - name: monitor port: 6567 targetPort: 8222 type: NodePortIt’s important to note that if using NATS in production, a NATS cluster should be configured. Get more information on setting up a NATS cluster on Kubernetes.
Within the k8s folder, let's examine todo-service.yml. This yaml file consists of a deployment. No Kubernetes service is needed because the todo service communicates via NATS and doesn’t need to be exposed to the cluster. Use Kubectl to create the deployment and the previous commands to see if the pod is running.
kubectl apply -f .\k8s\todo-service.ymlkubectl get podskubectl logs <pod-name>The log should show that the subscription has started.
Using natsconnection string: nats://nats-service:6565Command Bus connected to nats://nats-service:6565Starting subscription for command handler TodoMessages.CreateTodoAs part of the container template, we specify the NATS connection via an environment variable. We use the name given to the NATS service and the port the service exposed internally to the cluster.
apiVersion: apps/v1beta1kind: Deploymentmetadata: name: todo-service-deploymentspec: selector: matchLabels: app: todo-app component: todo-service replicas: 1 template: metadata: labels: component: todo-service app: todo-app version: v1 spec: containers: - name: todo-service image: joelvbrinkley/todo-service:v1 env: - name: NATS_CONNECTION value: nats://nats-service:6565Within the k8s folder, let's examine todo-webapp.yml. This yaml file consists of a deployment and a service that exposes the MVC application externally. Use Kubectl to create the deployment and service. Again, we’ll use the previous commands to see if the pod is running.
kubectl apply -f .\k8s\todo-webapp.ymlkubectl get podskubectl logs <pod-name>The log should show that your ASP.NET Core application has started and is listening on port 80.
Hosting environment: K8sContent root path: /appNow listening on: http://[::]:80Application started. Press Ctrl+C to shut down.As part of the container template, we assign the ASPNETCORE_ENVIRONMENT variable and expose port 80. The service maps port 51101 to container port 80. The type LoadBalancer tells Kubernetes to use an external load balancer in Azure so the website is exposed externally. Creating this service can take some time. Check the service for an external IP.
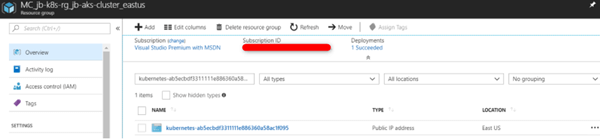
kubectl get servicesNAME TYPE CLUSTER-IP EXTERNAL-IP PORT(S) AGEkubernetes ClusterIP 10.0.0.1 <none> 433/TCP 4dnats-service NodePort 10.0.39.147 <none> 6565:30831/TCP,6566:30967/TCP,6567:31324/TCP 3dtodo-webapp-service LoadBalancer 10.0.35.199 52.224.167.126 51101:31497/TCP 7m You can see in the Azure Portal that this creates a public IP address.
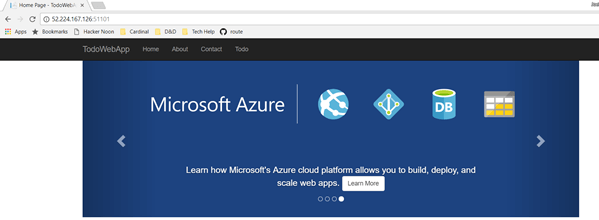
Navigate to the URL and port provided by Kubectl get services. The MVC home page should load.
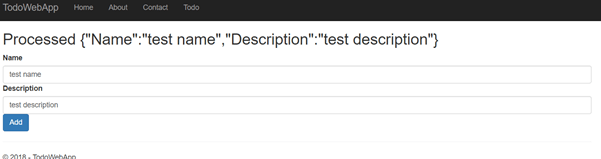
Navigate to the todo section, enter a name and description, and then press Add. This sends a command via NATS to the back-end service. The MVC controller waits for a response and displays it to the view.
Check the logs of the service to verify it was processed.
kubectl logs <todo-service-pod-name> You should see a message that your todo command was processed.
Using natsconnection string: nats://nats-service:6565Command Bus connected to nats://nats-service:6565Starting subscription for command handler TodoMessages.CreateTodoProcessing create todo command: test name, test description Realizing the full value of containers in production requires container orchestration. AKS makes it quick and easy to get started leveraging Kubernetes to build scalable applications in Azure.
Though not covered in this tutorial, .NET Core application modernization with container orchestration has a lot of potential. As support grows for Windows containers, it will become easier to modernize a legacy .NET Core application by containerizing it and deploying it in the cloud.
It also becomes easier to deploy new services to extend legacy application functionality. This approach saves IT organizations from having to do complete application rewrites and focuses on new business value and speed to market.
You should now have an idea about how easy it is to set up AKS and start structuring applications to take advantage of the platform.
Advertisement