Tech tutorials Leveraging Azure Data Factory for Multi-Environment Development
By Insight Editor / 25 Jul 2017 , Updated on 16 May 2019 / Topics: Microsoft Azure
By Insight Editor / 25 Jul 2017 , Updated on 16 May 2019 / Topics: Microsoft Azure
Within a mature Business Intelligence (BI) environment, it’s common to have multiple environments — for example, development, test and production. Azure Data Factory (ADF) implementations should be built and deployed to allow for ease of transition between these environments, which require different configurations.
The use of configuration files within the Visual Studio ADF plug-in allows for the simple creation of multi-environment pipeline deployment while maintaining only one set of ADF code. Each configuration file contains JSON values, which will override the values set on the main linked services, tables and pipelines. Within Visual Studio, users can publish the ADF job to their respective servers while choosing the appropriate configuration file.
The scope of this article doesn’t include the how-to on creation of an ADF pipeline. The assumption is that a pipeline already exists, and we’re looking for process improvement. Within Visual Studio, there’s the option to create a new project that has an existing ADF template, along with sample data — make sure you have the Azure Software Development Kit (SDK) download and ADF Tools for Visual Studio 13 or ADF Tools for Visual Studio 15. (Visual Studio 17 doesn’t support these features yet.)
Otherwise, existing ADF jobs in the Azure portal can be created as a Visual Studio project if connected to your Azure subscriptions in the Cloud Explorer. Simply right-click the data factory instance and choose the Export to New Data Factory option. Once the ADF job is created as a Visual Studio project, we can maintain one code base and begin creating the configuration files.
To create the first configuration file, simply right-click the data factory and choose New Item listed under the Add section. In the new item window, choose the second option for Config and then Configuration File. Provide a name for the file — in this case, let’s go with “dev” to start the development environment configuration file creation.

By default, the file will contain sample JSON code, which can be used as reference to create your own. For our example, let’s walk through a few instances of useful JSON name/value combinations to differentiate the environments. One value that will always differ between environments is the server name and the user accessing the server. Here’s an example default linked service in an ADF job:

If the property exists in the linked service definition, it can be overwritten by the values in the configuration file. In the newly created ‘dev.json’ configuration file from the previous step, format it as shown below to ensure the value from the configuration file is used during publish to the server.

Let’s add some clarity to exactly what is happening above in the configuration file and why it’s written in this manner. All JSON attributes have a specific path to get their values. To provide an overriding value in our configuration file, we’ll need to specify each attribute path exactly in our ‘name’ attribute. The ‘$’ will represent the root of the linked service — in this case, the name, followed by the full path to define the server details specific to each environment.
A few important items to point out in the creation of the configuration file:
Another common use case for configuration files is setting properties in the pipeline for start time and end time and setting the ‘IsPaused’ feature to true or false. We’ll see below that authoring these attributes is the same process as the linked service instance above.
Again, ensure the pipeline name matches between the configuration file and the pipeline itself. It’s a safe practice to set ‘IsPaused’ to ‘true,’ so you can validate the ADF job after publishing to the server and before running it.
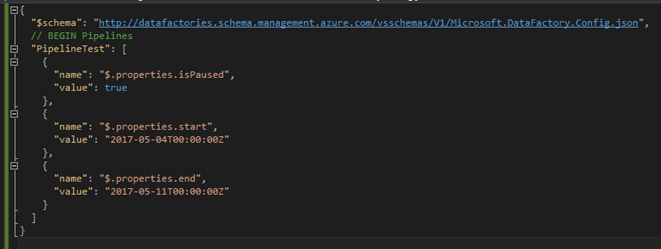
As reference, the pipeline may look similar to this:

It’s expected upon publishing to the portal that the start and end times, as well as ‘IsPaused,’ will be updated to reflect the values set in the configuration file. Notice the values don’t match between the ADF job definition and configuration file. This shows the flexibility available to maintain one ADF project while maintaining the option for environmental differences.
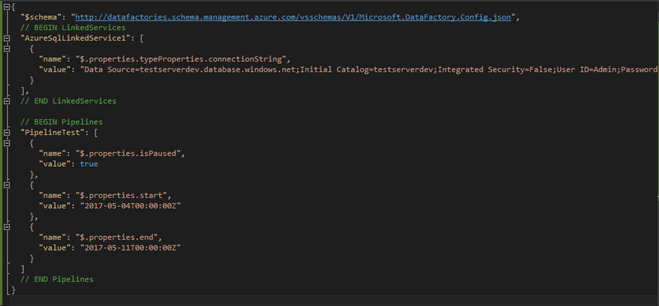
At this point, we should expect the ‘dev.json’ configuration file to look similar to the following:
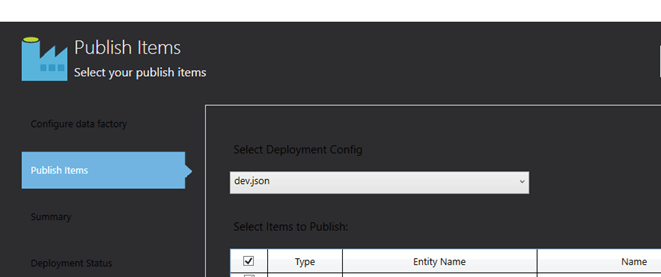
With that, the configuration file is now all set to be used when publishing a pipeline to the Azure portal. This process can be followed for each environment as needed, with a separate configuration file for each. We’ll see in the publish process there’s an option to choose which configuration file to set. To publish the ADF job to Azure, right-click the project name and choose Publish. In the first window, select the existing ADF server from the drop-down menu.
Next, specify which configuration file to use and which items to include in the publish.
After specifying the configuration file, you can publish the ADF job to the Azure portal and see the results. In this example, the pipeline is paused and ready to review. We have now successfully created our first environment-specific ADF deployment through Visual Studio and are on the way to consistent, clean development between multiple environments for future enhancements.
Taking advantage of Visual Studio and its plug-in capabilities for Azure services simplifies consistent development between environments. Following this process, developers are able to maintain one master Data Factory project and environmental integrity by using configuration files. Authoring and deploying Data Factory jobs in this manner through Visual Studio — rather than the Azure portal — also allows development to be contained within the built-in source control developers are used to.
Advertisement