Tech tutorials Pester PowerShell Infrastructure Test Tutorial
By Insight Editor / 13 Feb 2018 , Updated on 16 May 2019 / Topics: Cloud Microsoft Azure
By Insight Editor / 13 Feb 2018 , Updated on 16 May 2019 / Topics: Cloud Microsoft Azure
The ability to create and maintain infrastructure in the cloud using Infrastructure as Code (IaC) allows us to approach defining network infrastructure using software engineering principles. We can use source control to version and keep a history of the infrastructure. We can also create Continuous Integration and Deployment pipelines.
A key piece of Continuous Integration and Deployment is executing automated tests against the solution. In this article, we’ll discuss how we can automatically test infrastructure deployments using PowerShell and Pester.
Just as in writing software, mistakes will be made when writing IaC. Finding bugs late in the lifecycle is more expensive. Proper testing can find these mistakes easier, faster and more reliably, increasing the quality of the product.
When I first started with IaC, I would eyeball-test my cloud deployment. I would navigate to the Microsoft Azure Portal and ensure the resource group existed and was in the right location. Then I would look at any Virtual Machines (VMs) I created to ensure they matched my Azure Resource Manager (ARM) Template resource definition.
That was a time-consuming and tedious approach, lending itself to mistakes. The software engineer in me felt scared as I remembered the old days of manually testing software changes. There must be a better way. Luckily, there is a better way to test, and it's called Pester.
Pester is a flexible testing framework for PowerShell. Pester tests are written as PowerShell scripts. This provides the ability to validate and verify our infrastructure using PowerShell. Essentially, if you can retrieve information with PowerShell, you can verify the information with Pester.
Since Pester tests are scripts, they can be executed automatically within an IaC deployment and Continuous Integration and Deployment pipeline. For example, we can deploy a VM through a portal or through IaC, create a Pester test script that uses PowerShell to get the VM, then verify the VM exists and validate its current state. Just like any other testing framework, Pester will output if the tests pass or fail, and the reason for any failed tests.
Pester is available as a PowerShell module. To install it, open PowerShell as an administrator and run the following:
Install-Module -Name Pester -Force -SkipPublisherCheck
The Pester test structure consists of four keywords: Describe, Context, It and Should.
Describe is the parent element of the Pester test file. The Describe block defines a group of tests, and all Pester test files must contain at least one Describe block.
Context is an optional element and defines a subgroup of tests within a Describe block. Context blocks provide an additional level of scoping and state for the tests defined in the Context block.
It defines a single test. When we invoke the Pester test file, the It block will produce a pass/fail result. As with the Context block, the It block also receives its own level of scope separate from Describe and Context. It blocks can exist in a Context or Describe block.
Should is how Pester asserts a test. These assertions of our expected values are simple tests that should result in a Boolean result for pass or fail. The Should command comes with many operators. The most common are Should Be, Should BeExactly and Should Throw. For a full list, visit the Pester wiki.
Describe, Context and It blocks are similar as each is assigned a name and a script block containing fully functional PowerShell code to execute. If you can write it in PowerShell, you can include it one of these blocks. Each block also has a scope level with the parent scope being the Describe block.
Context and It have nested scope. Therefore, anything defined in the It block is only available in the It block. Anything defined in the Context block is available in the Context block, as well as in any It blocks within the Context. Anything defined in the Describe block is available in the Describe block, Context blocks and It blocks.
The final piece to the Pester puzzle is to invoke the Pester tests. With the Pester module comes a PowerShell cmdlet named Invoke-Pester. To execute the Pester tests, we only need to invoke this cmdlet and pass the file location of the Pester test script with the -Script parameter.
To demonstrate testing an IaC deployment with Pester, we’ll deploy an Azure Recovery Services Vault and create a policy using PowerShell and ARM Templates. The steps to accomplish this task include creating the Recovery Vault ARM Template, the ARM Template parameters file, invoking the deployment with PowerShell and then using Pester to test the deployment.
Feel free to download the links to the files used and the folder structure, and follow along using your favorite editor.

First, let's investigate our Pester test file. Open the New-RecoveryVault.Tests.ps1 file. Inside, you'll notice the Pester test structure. We have one Describe block named New-RecoveryVault Tests. Inside this block, I made use of Contexts to separate testing the Resource Group from the Azure Recovery Services Vault. This allowed me to create variables at a scope in relation to the context of the It test case assertions.
For the Resource Group, I'm testing to ensure the resource group exists and is located in the proper Azure region. For the Recovery Vault, I'm testing it exists and is named to my expected value. I also test the policy was created with the appropriate name. While these tests suffice for this demonstration, we could add more tests, such as the frequency the backups will execute.
Next, let's look at the configuration JSON. I used a JSON file to limit copying and pasting of expected values. By using JSON, I can read these values into a JSON object and use that object in the PowerShell deploy file and Pester tests.
Finally, let's take a look at the deploy.ps1 file. In it, you'll see the standard PowerShell ARM Template deployment code. The last line in the file is where the Pester tests are invoked. I invoke Pester with the Invoke-Pester cmdlet and provide the location of my test file with the Script parameter. Pester also accepts a directory for the Script parameter and will recuse and execute each test file it finds.
To deploy and execute the Pester tests, navigate to the folder containing deploy.ps1 and execute within a PowerShell terminal.
You should see output for your deployment. At the end of the output, you’ll see the results of the Pester tests. They should look like the following:
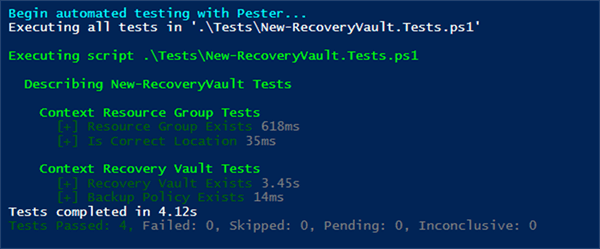
There we have it. Pester is telling us our Recovery Vault and policy deployed as expected and without error. It did all the hard work for us, and it executed the tests automatically after the deployment.
Take a peek at your Azure Portal. You should see the Recovery Vault and the policy defined within that vault. Since Pester is flexible, you can use a similar method in a Continuous Integration and Deployment pipeline, as well.
As our example demonstrated, it’s recommended to store any expected values as JSON. By using JSON, we can create our resources and run our tests using the same data object, limiting the occurrences of copying and pasting values across files.
The Pester test file should be named in a way to know the context of the tests without ever opening the file. In our example, we created an Azure Recovery Services Vault and backup policy, so I named our Pester test file New-RecoveryVault.tests.ps1.
Use Context blocks especially in situations where your test file is large. Not only will they provide proper scoping, but they’ll also help organize your tests.
Advertisement