Tech tutorials Protecting Windows Communication Foundation (WCF) With Azure AD
By Insight Editor / 20 Apr 2015 , Updated on 16 May 2019 / Topics: Microsoft Azure
By Insight Editor / 20 Apr 2015 , Updated on 16 May 2019 / Topics: Microsoft Azure
Mobile services. Model-View-Controller (MVC) web APIs. They’re ubiquitous now. In some cases, though, WCF is still the platform of choice for service developers. Sometimes it’s interoperability with other services; sometimes it’s just not wanting to rewrite old code. Or perhaps a large part of your architecture requires service hosts + factories. Whatever the reason, it’s not feasible to rewrite or re-architect large swaths of systems just to add authentication.
Let’s look at a typical three-tier app — User Interface (UI), service and data:
 With Azure AD")
Firewalls keep everyone out except our web app.
Here we have a web app, which talks to an unauthenticated service, which talks to some data. Pretty simple stuff. The box indicates the internet permeability — if the web server is the only thing exposed to the internet, this is a generally OK approach. If nothing has access to the service except the target consumer, what could go wrong? How hard could it be?
In this model, your web app is handling authenticating clients, which then proxies requests back to the service. A pretty standard model.
But let’s extrapolate further. How many services only have a single web client anymore? Everything is connected, and everything is borrowing data from everything else. Not only are we going to have trusted hosts, but we’re also going to have mobile apps. Perhaps we expose an API. There are lots of things to consider. Here’s how I’d expect our app to look from a modern looking glass:
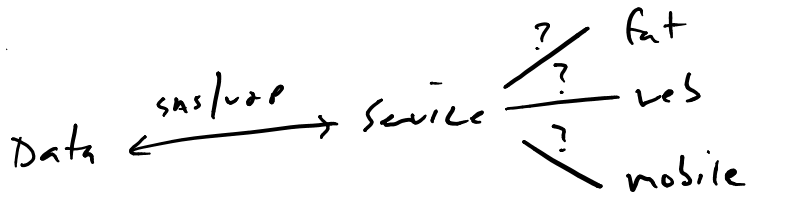
Our service now has to handle multiple clients — and they're not all coming from a trusted host.
Our app has to handle a number of potentially unknown entry points.
So what are we to do? We can leverage OAuth server to server to secure our services. This way, we’re not publishing a static key into our mobile applications. As anyone who’s seen how trivial it is to decompile an Android app knows, you can never trust the client. There are two options: We’re going to dig into the first (application-only, two-legged OAuth), and we’ll briefly touch on three-legged.
Our first option is:
This is application-only access, also known as two-legged OAuth. In this model, the server doesn’t need to know a specific user principal, but an app principal. A principal token is required by the service and is requested by the client:
This option is somewhat different. Instead of using an application principal to connect to our service, we’re going to be connecting on behalf of the user. This is useful for:
In this model, users authenticate and authorize the application to act on their behalf, issuing an access token upon successful authentication. The application then uses that token for requesting resources. If you’ve ever used an app for Facebook or Twitter, you’ve been through a three-legged OAuth model.
There are two pieces we need to build: a server-side service behavior that inspects and validates the incoming token, and a client-side filter that acquires a token and stuffs it in the authorization header before the WCF message is sent. We’ve used this pattern on a few projects now. This is a good resource for more details and similar implementations.
We need to do three things:
On the service side, we want something that can inspect the messages as they come in. This inspector will both grab the token off the request and validate it.
Looking through here, we’ll find pretty much everything we need to make our WCF service ready to receive and validate tokens. The highlights:
Here, we’re doing the main chunk of work. AfterReceiveRequest is fired after the WCF subsystem receives the request but before it’s passed onto the service implementation. Sounds like the perfect place for us to do some work.
We’re starting by inspecting the header for the authorization header, finding the federation metadata for that tenant and validating the token. System.IdentityModel.Tokens.JwtSecurityTokenHandler does the heavy lifting here (it’s a NuGet package), handling the round trips to Azure AD to validate the token based on the configuration. Take note of the TokenValidationParameters object; any misconfiguration here will cause validation to fail.
public class BearerTokenMessageInspector : IDispatchMessageInspector
{
    private InspectorConfiguration _config;
    private readonly string _audience = "AUDIENCE_URI";
    private readonly string _authority = "https://login.windows.net/TENANT_ID_OR_URI";

    static string _issuer = string.Empty;
    static List<X509SecurityToken> _signingTokens = null;
    static DateTime _stsMetadataRetrievalTime = DateTime.MinValue;
    private const string ScopeClaimType = "http://schemas.microsoft.com/identity/claims/scope";

    public object AfterReceiveRequest(ref Message request, IClientChannel channel, InstanceContext instanceContext)
    {
        object correlationState = null;

        var requestMessage = request.Properties["httpRequest"] as HttpRequestMessageProperty;
        if (request == null)
        {
            throw new InvalidOperationException("Invalid request type.");
        }
        var authHeader = requestMessage.Headers["Authorization"];

        if (!string.IsNullOrEmpty(authHeader) && this.Authenticate(authHeader)) return null;
        var error = new WcfErrorResponseData(HttpStatusCode.Unauthorized, string.Empty, new KeyValuePair<string, string>("WWW-Authenticate", "Bearer authorization_uri=\"" + _authority + "\"" + "," + "resource_id=" + _audience));
        correlationState = error;

        return correlationState;
    }

    private bool Authenticate(string authHeader)
    {
        const string bearer = "Bearer ";
        if (!authHeader.StartsWith(bearer, StringComparison.InvariantCultureIgnoreCase)) { return false; }

        var jwtToken = authHeader.Substring(bearer.Length);
        var token = new JwtSecurityToken(jwtToken);

        string issuer;
        var stsMetadataAddress = string.Format("{0}/federationmetadata/2007-06/federationmetadata.xml", _authority);
        List<X509SecurityToken> signingTokens;

        GetTenantInformation(stsMetadataAddress, out issuer, out signingTokens);

        var tokenHandler =
                new JwtSecurityTokenHandler()
                {
                    // if using self-signed, leave this; otherwise replace token signing certs with peer or chain trusted ones. for the best security, this should really use public CA-issued certificates
                    Configuration = new SecurityTokenHandlerConfiguration() { CertificateValidationMode = X509CertificateValidationMode.None }
                };

        //update this into config
        var validationParameters = new TokenValidationParameters()
        {
            ValidAudience = _audience,
            ValidIssuer = issuer,
            IssuerSigningTokens = signingTokens
        };

        SecurityToken validatedToken;
        var claimsPrincipal = tokenHandler.ValidateToken(jwtToken, validationParameters, out validatedToken);

        Thread.CurrentPrincipal = claimsPrincipal;

        if (HttpContext.Current != null)
        {
            HttpContext.Current.User = claimsPrincipal;
        }

        return (ClaimsPrincipal.Current.FindFirst(ScopeClaimType) == null) || (ClaimsPrincipal.Current.FindFirst(ScopeClaimType).Value == "user_impersonation");
    }

    /// <summary>
    /// Parses the federation metadata document and gets issuer Name and Signing Certificates
    /// </summary>
    /// <param name="metadataAddress">URL of the Federation Metadata document</param>
    /// <param name="issuer">Issuer Name</param>
    /// <param name="signingTokens">Signing Certificates in the form of X509SecurityToken</param>
    static void GetTenantInformation(string metadataAddress, out string issuer, out List<X509SecurityToken> signingTokens)
    {
        signingTokens = new List<X509SecurityToken>();

        // The issuer and signingTokens are cached for 24 hours. They are updated if any of the conditions in the if condition is true.
        if ((DateTime.UtcNow.Subtract(_stsMetadataRetrievalTime).TotalHours > 24)
                || string.IsNullOrEmpty(_issuer)
                || _signingTokens == null)
        {
            var serializer = new MetadataSerializer()
            {
                //this probably shouldn't be in production code - these certs should be validated, but there doesn't appear to be a trust chain.
                CertificateValidationMode = X509CertificateValidationMode.None
            };
            var metadata = serializer.ReadMetadata(XmlReader.Create(metadataAddress));

            var entityDescriptor = (EntityDescriptor)metadata;

            // get the issuer name
            if (!string.IsNullOrWhiteSpace(entityDescriptor.EntityId.Id))
            {
                _issuer = entityDescriptor.EntityId.Id;
            }

            // get the signing certs
            _signingTokens = ReadSigningCertsFromMetadata(entityDescriptor);

            _stsMetadataRetrievalTime = DateTime.UtcNow;
        }

        issuer = _issuer;
        signingTokens = _signingTokens;
    }

    static List<X509SecurityToken> ReadSigningCertsFromMetadata(EntityDescriptor entityDescriptor)
    {
        var stsSigningTokens = new List<X509SecurityToken>();

        var stsd = entityDescriptor.RoleDescriptors.OfType<SecurityTokenServiceDescriptor>().First();

        if (stsd != null)
        {
            var x509DataClauses = stsd.Keys.Where(key => key.KeyInfo != null && (key.Use == KeyType.Signing || key.Use == KeyType.Unspecified)).
                                                                        Select(key => key.KeyInfo.OfType<X509RawDataKeyIdentifierClause>().First());

            stsSigningTokens.AddRange(x509DataClauses.Select(token => new X509SecurityToken(new X509Certificate2(token.GetX509RawData()))));
        }
        else
        {
            throw new InvalidOperationException("There is no RoleDescriptor of type SecurityTokenServiceType in the metadata");
        }

        return stsSigningTokens;
    }

    public void BeforeSendReply(ref Message reply, object correlationState)
    {
        var error = correlationState as WcfErrorResponseData;
        if (error == null) return;
        var responseProperty = new HttpResponseMessageProperty();
        reply.Properties["httpResponse"] = responseProperty;
        responseProperty.StatusCode = error.StatusCode;

        var headers = error.Headers;
        if (headers == null) return;
        foreach (var t in headers)
        {
            responseProperty.Headers.Add(t.Key, t.Value);
        }
    }
}
Next, we’ll need to create a service behavior, instructing WCF to apply our new MessageInspector to the MessageInspector collection.
public class BearerTokenServiceBehavior : IServiceBehavior
{
    public void AddBindingParameters(ServiceDescription serviceDescription, ServiceHostBase serviceHostBase, Collection<ServiceEndpoint> endpoints, BindingParameterCollection bindingParameters)
    {

    }

    public void ApplyDispatchBehavior(ServiceDescription serviceDescription, ServiceHostBase serviceHostBase)
    {
        foreach (var epDisp in serviceHostBase.ChannelDispatchers.Cast<ChannelDispatcher>().SelectMany(chDisp => chDisp.Endpoints))
        {
            epDisp.DispatchRuntime.MessageInspectors.Add(new BearerTokenMessageInspector());
        }
    }

    public void Validate(ServiceDescription serviceDescription, ServiceHostBase serviceHostBase)
    {

    }
}
This is a simple class to add the service behavior to an extension that can be controlled via config.
public class BearerTokenExtensionElement : BehaviorExtensionElement
{
    public override Type BehaviorType
    {
        get { return typeof(BearerTokenServiceBehavior); }
    }

    protected override object CreateBehavior()
    {
        return new BearerTokenServiceBehavior();
    }
}
This is a helper for returning error data in the result of a broken authentication call. We can return a WWW-Authenticate header here (in the case of a 401), instructing the caller where to retrieve a valid token.
internal class WcfErrorResponseData
{
    public WcfErrorResponseData(HttpStatusCode status) : this(status, string.Empty, new KeyValuePair<string, string>[0]){ }
    public WcfErrorResponseData(HttpStatusCode status, string body) : this(status, body, new KeyValuePair<string, string>[0]) { }

    public WcfErrorResponseData(HttpStatusCode status, string body, params KeyValuePair<string, string>[] headers)
    {
        StatusCode = status;
        Body = body;
        Headers = headers;
    }

    public HttpStatusCode StatusCode
    {
        private set;
        get;
    }

    public string Body
    {
        private set;
        get;
    }

    public IList<KeyValuePair<string, string>> Headers
    {
        private set;
        get;
    }
}
The last piece is updating the WCF service’s config to enable that message inspector:
<system.serviceModel>
  <behaviors>
    <serviceBehaviors>
      <behavior>
        <!-- snip -->
        <bearerTokenRequired/>
      </behavior>
    </serviceBehaviors>
  </behaviors>
  <extensions>
    <behaviorExtensions>
      <add name="bearerTokenRequired" type="AuthenticatedService.Inspector.BearerTokenExtensionElement, AuthenticatedService.Inspector"/>
    </behaviorExtensions>
  </extensions>
  <!-- snip -->
</system.serviceModel>
Now that our service is set up to both find and validate tokens, we need our clients to acquire and send those tokens over in the headers. This is much simpler, thanks to the Azure AD Authentication Libraries. Getting a token is about a five-line operation.
The AuthorizationHeaderMessageInspector runs on a client and handles two things: acquiring the token and putting it in the proper header.
public class AuthorizationHeaderMessageInspector : IClientMessageInspector
{
    private readonly string _token;
    public AuthorizationHeaderMessageInspector(string token)
    {
        _token = string.IsNullOrEmpty(token) ? AzureAdToken.Get() : token;
    }

    public object BeforeSendRequest(ref System.ServiceModel.Channels.Message request, System.ServiceModel.IClientChannel channel)
    {
        HttpRequestMessageProperty httpRequest;
        if (request.Properties.ContainsKey(HttpRequestMessageProperty.Name))
        {
            httpRequest = request.Properties[HttpRequestMessageProperty.Name] as HttpRequestMessageProperty;
        }
        else
        {
            httpRequest = new HttpRequestMessageProperty();
        }

        if (httpRequest != null) httpRequest.Headers.Add("Authorization", string.Format("Bearer {0}", _token));

        return null;
    }
    public void AfterReceiveReply(ref System.ServiceModel.Channels.Message reply, object correlationState)
    {

    }
}
This is a simple helper for acquiring the token using Azure AD Authentication Libraries. You can modify this to pop a browser window and get user tokens. Or, using this code, it’s completely headless and an application-only token. Azure AD Authentication Libraries also handles caching the tokens, so no need to fret about calling this on every request.
public static class AzureAdToken
{
    public static string Get()
    {
        const string clientSecret = "CLIENT_SECRET";
        const string clientId = "CLIENT_ID";
        var ctx = new AuthenticationContext("https://login.windows.net/TENANT_NAME_OR_ID");
        var token = ctx.AcquireToken("TARGET_RESOURCE", new ClientCredential(clientId, clientSecret));
        return token.AccessToken;
    }
}
A wrapper to add the AuthorizationHeaderMessageInspector to your outgoing messages:
public class AuthorizationHeaderEndpointBehavior : IEndpointBehavior
{
    public void ApplyClientBehavior(ServiceEndpoint endpoint, System.ServiceModel.Dispatcher.ClientRuntime clientRuntime)
    {
        clientRuntime.ClientMessageInspectors.Add(new AuthorizationHeaderMessageInspector(AzureAdToken.Get()));
    }
    public void AddBindingParameters(ServiceEndpoint endpoint, System.ServiceModel.Channels.BindingParameterCollection bindingParameters)
    {
    }

    public void ApplyDispatchBehavior(ServiceEndpoint endpoint, System.ServiceModel.Dispatcher.EndpointDispatcher endpointDispatcher)
    {
    }

    public void Validate(ServiceEndpoint endpoint)
    {
    }
}
A simple extension method for adding the endpoint behavior to the service client:
public static class EndpointExtension
{
    public static void AddAuthorizationEndpointBehavior(this ServiceEndpoint endpoint)
    {
        endpoint.EndpointBehaviors.Add(new AuthorizationHeaderEndpointBehavior());
    }
}
Wrap it all together, and here’s what we have: a simple call to ServiceClient.Endpoint.AddAuthorizationEndpointBehavior(), and our client is configured with a token. Your callout should include the header, which the service will consume and validate, sending you back some data. Easy, right?
var a = new Auth.AuthServiceClient();
a.Endpoint.AddAuthorizationEndpointBehavior();
var me = a.WhoAmI();
Console.WriteLine(me);
Console.ReadLine();
The last thing we need to do is configure Azure AD with our applications. I’m hopeful if you’ve made it this far that adding a new application to Azure AD isn’t taxing your mental resources, so I won’t get into how to create the applications. Once they’re created, we need to do two things: expose the permission and grant that to our client.
The app manifest is the master configuration of your application’s configuration. You can access it via the portal using the Manage Manifest in the menu of your app:
public class BearerTokenServiceBehavior : IServiceBehavior
{
    public void AddBindingParameters(ServiceDescription serviceDescription, ServiceHostBase serviceHostBase, Collection<ServiceEndpoint> endpoints, BindingParameterCollection bindingParameters)
    {

    }

    public void ApplyDispatchBehavior(ServiceDescription serviceDescription, ServiceHostBase serviceHostBase)
    {
        foreach (var epDisp in serviceHostBase.ChannelDispatchers.Cast<ChannelDispatcher>().SelectMany(chDisp => chDisp.Endpoints))
        {
            epDisp.DispatchRuntime.MessageInspectors.Add(new BearerTokenMessageInspector());
        }
    }

    public void Validate(ServiceDescription serviceDescription, ServiceHostBase serviceHostBase)
    {

    }
}

Download your manifest and check it out. It’s likely pretty simple. We want to add a chunk to the oauth2Permissions block and then upload it back into the portal:
"oauth2Permissions": [
    {
      "adminConsentDescription": "Allow the application access to the service",
      "adminConsentDisplayName": "Have full access to the service",
      "id": "b69ee3c9-c40d-4f2a-ac80-961cd1534e40",
      "isEnabled": true,
      "origin": "Application",
      "type": "User",
      "userConsentDescription": "Allow the application full access to the service on your behalf",
      "userConsentDisplayName": "Have full access to the service",
      "value": "user_impersonation"
    }
  ],
What is this doing, exactly? It’s allowing us to expose a specific permission to Azure AD so we can grant that permission to other Azure AD applications. Head over to your client application’s Azure AD app record. Near the bottom of the Configure section, we’ll see Permissions to other applications — let’s find our service in this list.
Once you’ve found it, you can grant specific permissions. Extrapolate this further, and you can see there’s certainly room for improvement. Perhaps other permission sets and permissions are available within our app? They can be exposed and granted here.

Ed note: It's finally out of preview.
What you’ve seen is a ready-to-go example of using Azure AD to authenticate your applications. You now have a better way than shared credentials or no authentication on your services.
This article originally appeared on April 20, 2015.
Advertisement