Tech tutorials Using Build Definitions With Visual Studio Online
By Insight Editor / 19 May 2016 , Updated on 16 May 2019 / Topics: Application development Microsoft Azure
By Insight Editor / 19 May 2016 , Updated on 16 May 2019 / Topics: Application development Microsoft Azure
Visual Studio Online has provided many tools to expand upon past simply serving as a source control repository. From managing work items to providing tools for automated tests and now officially supporting Git, it has grown greatly since its inception. One of the newer and more useful features provided is the ability to write and execute build definitions. These build definitions can be used to deploy code to test and production environments, enable automated unit testing and much more.
This blog post assumes you have a basic understanding of Microsoft's Azure cloud hosting platform. The test application created for this blog is hosted in Azure, and that’s the environment you’ll be deploying to. I won't go over the details here, but I’ll assume a web app is created for the application and exists in Azure.
Additionally, I’ll be using Git as the source control system for this project. Git is quickly becoming the standard source control system for software development and has gone from being supported by Visual Studio Online to being a first-class citizen. Many of the tools in Visual Studio Online didn’t support Git until recently.
Before moving any further, it makes sense to talk about the advantages of using build definitions for any project hosted in Visual Studio Online. For many projects, build definitions are used as a means to implement Continuous Integration (CI). CI is a practice that works best when developers check in their code to a central repository as frequently as possible, whereas an automated build verifies that a given check-in produces a repeatable build and can then run other steps, such as unit tests, to verify code quality.
This automation can be managed using Visual Studio Online build definitions, with steps available to deploy code to Azure, perform unit tests, package code and much more. We’re implementing a very basic example of CI in this example (build each check in and deploy to a test environment), but it’s worth noting that the realm of continuous integration is much more broad than what’s covered here.
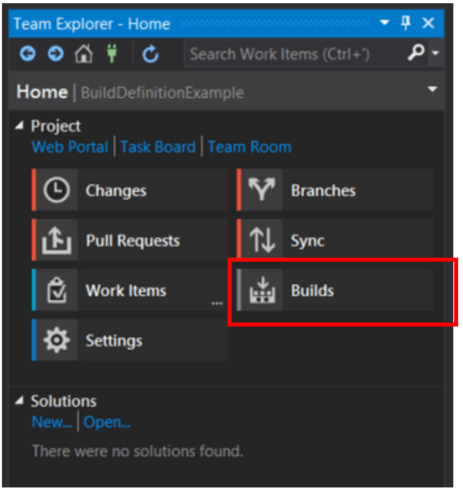
You can create a build definition directly from Visual Studio Online or from within Visual Studio. To create a build definition from within Visual Studio, navigate to the Builds tab in the Team Explorer:
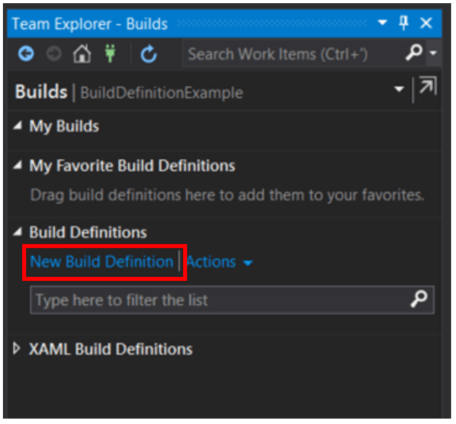
Once there, you can click New Build Definition to be taken directly to Visual Studio Online. This is where you would start if you had decided to create the build definition directly from Visual Studio Online instead of starting in Visual Studio.
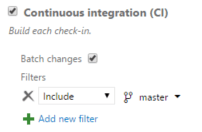
On the dialog box that pops up in the browser, we’ll select Visual Studio as our build template, but you can see there are other templates for use, such as Xamarin for Android or iOS and the Universal Windows Platform. The default settings for your build definition should be correct for the most part, but you’ll need to check the Continuous integration checkbox. Here’s what they look like for this example:
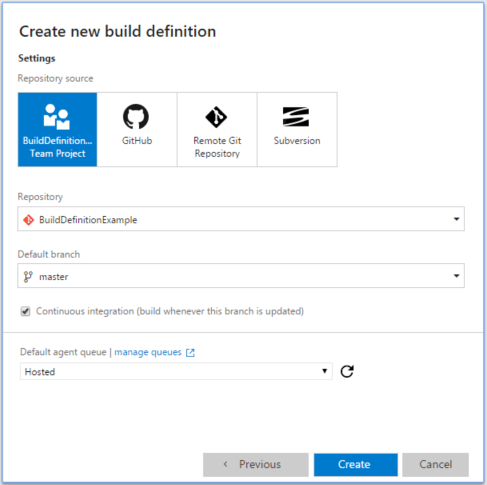
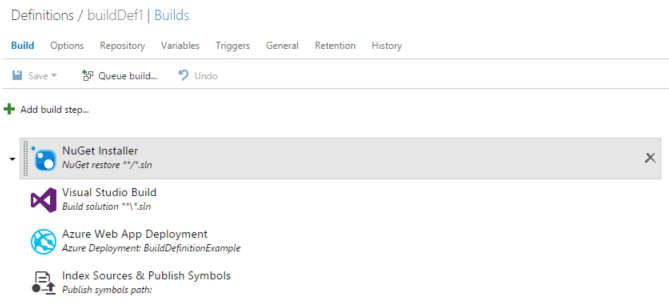
Because this is a simple example and we don't need the additional flexibility the Default queue provides, we can leave the default Hosted option selected in the Default agent queue field. For more information on the restrictions on the Hosted pool, see Microsoft’s article on Microsoft-hosted agents. You can see the checkbox for CI at the bottom of the dialog. This is enabled so that Visual Studio Online will execute the defined build definition for each check-in. The build definition will define whether or not this build code is published to an environment. Since we want to continually build and deploy to our web environment, we’ll check this box. After clicking Create, you’ll be taken to the Definitions page of the build definition you just created. You’ll see there are already some build steps included by default. For the purposes of this example, we’re creating a build definition that’s very simple and only has four steps: restoring NuGet packages, building, deployment and publishing symbols.
It’s for this reason we can remove the Visual Studio Test, Copy Files and Publish Build Artifacts steps. These are very useful definitions but beyond the scope of this article. We’ll also add a step that helps simplify publishing directly to an Azure Web App. To do this, click Add build step… and find the Azure Web App Deployment step:

Once that’s complete, you should have a build definition that looks something like this:
There are a few important steps to take to configure your Azure build step. You can choose an Azure Subscription that’s linked to your account or set up a connection using the Manage link to the right of the box with credentials from a publish profile. You also need to make sure you enter the name of the web app you want to deploy to.
In addition, you need to make sure the step for the Visual Studio Build is configured correctly. By default, the MSBuildArguments field is left blank; you’ll need the .zip artifacts when deploying to Azure so you can add the following arguments:
/p:DeployOnBuild=true /p:WebPublishMethod=Package /p:PackageAsSingleFile=true /p:SkipInvalidConfigurations=true
/p:PackageLocation="$(build.stagingDirectory)"
Once this is configured, you can add the following value to the Web Deploy Package field of the Azure Web App Deployment step:
$(build.stagingDirectory)\**\*.zip
This tells the deployment to look in the staging directory for the artifacts produced by the Visual Studio build step. If not configured properly, the Azure deployment step won’t be able to find a deployment package, and the build will fail.
If you navigate to the Triggers tab, you should see the CI box checked, and it will run each time code is checked in to the appropriate branch (in this case, master):
To test this, make a visible change in your project and commit the change to the master branch. After a while, you should see a queued build:
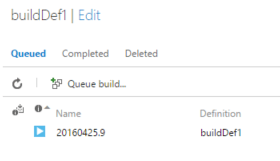
Once the build has succeeded, you can navigate to your web app and verify the change has been pushed to the web app.
Hopefully, this blog post has helped you understand how you can leverage Microsoft Azure build definitions to implement a CI process for your applications that are hosted in Visual Studio Online.
Advertisement